Roofing a house is a complex task that requires specialized skills, knowledge, and tools. This comprehensive guide will provide you with essential information on the steps involved, from securing a permit to installing new roofing materials.
Before beginning any roofing project, it’s important to secure the necessary permits. These may vary depending on your location and the size of the project. Always make sure to check local regulations and consult with a professional if necessary.
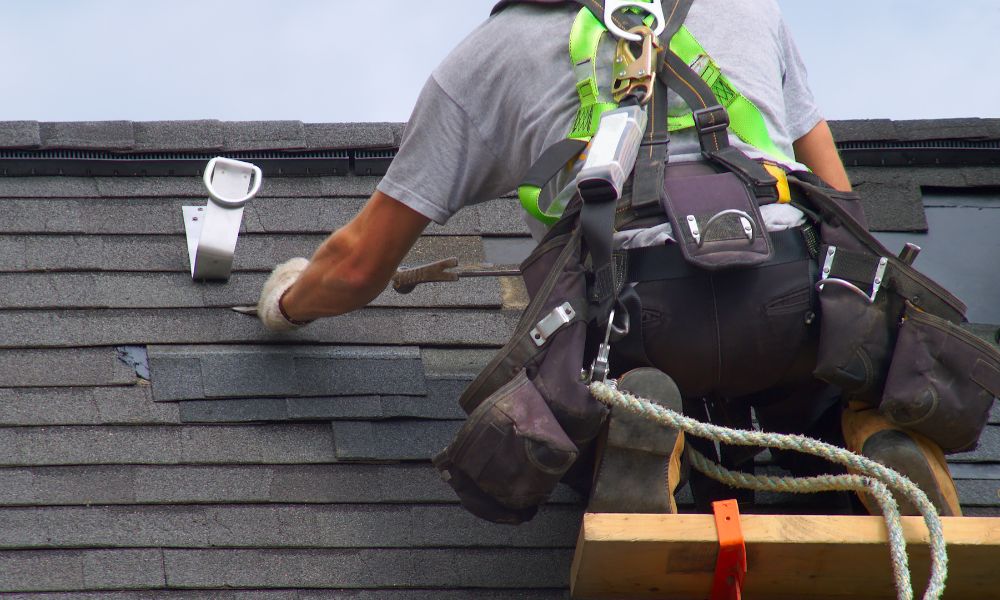
The first major step in roofing a house is removing the old roof. This involves carefully stripping off the existing shingles, exposing the underlying structure of your roof. You need to be mindful of potential hazards such as loose nails or unstable sections of the roof during this process. Always prioritize safety by wearing appropriate protective gear and using robust scaffolding or ladders.
Once the old roof has been removed successfully, it’s time to move onto installing underlayment. This material serves as an additional layer of protection between your home and nature’s elements, helping prevent water infiltration into your house’s structure. It is usually made up of weather-resistant synthetic fabrics or paper-based materials applied directly over your roofing deck.
After installing underlayment, it’s time for the shingles, tiles or metal panels – dependent on your choice of roofing material – to be laid down carefully across your roof surface. Make sure each piece is securely nailed or adhered as per manufacturer instructions to ensure maximum durability.
Below are some key takeaway points from this guide:
- Secure necessary permits: Always consult with local authorities for building regulations before starting any roofing works.
- Remove old roof: Safely remove all existing shingles or tiles while being cautious about potential hazards.
- Install underlayment: Apply water-resistant underlayment material directly onto your roof deck for added protection against leaks.
- Lay down new roof: Carefully install new roofing materials, ensuring each piece is securely nailed or adhered for maximum durability.
One crucial point to note is the complexity and danger associated with roofing tasks, making them unsuitable for DIY attempts. Unless you have relevant experience and appropriate safety equipment, it’s highly recommended to leave this task to professionals.
Roofing a house properly requires expertise and precise execution at every stage. With the right information and professional help, you can ensure that your home will be well-protected from the elements for many years to come.
When planning a roofing project, it is important to remember that building permits are not optional. They are necessary legal requirements to ensure that your project complies with local building codes and safety regulations. Here’s an overview of the critical steps needed to secure a permit for roofing projects.
Finding a Qualified Roofer in Northern Virginia Such as Nova Exteriors
https://www.novaexteriors.com/
The first crucial step is determining whether your project needs a permit. Some minor repairs may not require one, but larger jobs like a complete roof replacement will. Check with your local city or county building department and inquire about the specific requirements for roofing projects.
Exploring Roofing Companies in Northern Virginia
Once you’ve ascertained that you require a permit, start gathering the necessary documentation. This may include:
- Detailed description of proposed work
- Project plans or blueprints
- Copy of contractors’ licenses and insurance (if working with professional roofers)
- Property deed or proof of ownership
Find the Best Roofing Contractors in Northern Virginia
After gathering all required documents, submit your application to the appropriate office. Some municipalities allow online applications while others may require you to do this in person. Make sure you know who to contact and where to go.
Hire a Roofing Contractor in Northern Virginia
There will be some fees associated with your permit application. These vary widely based on the location, size of the project, and other factors. Ensure that these fees are paid on time as an unpaid fee could delay or even cancel your permit approval process.
Your Trusted Solution for Roof Repair in Northern Virginia
Once you’ve submitted everything, there’s usually a waiting period while your documents are reviewed and site inspections are potentially carried out. This can take anywhere from a few days to several weeks depending on local regulations and backlog.
Exploring Options for Roofing in Northern Virginia
After receiving approval, print out your permit (if applied online) or receive it by mail/in-person from the municipal office. The law requires you to display it at the job site so inspectors can see it when they come for an inspection.
Schedule Inspections
Once the work is underway or completed, you’ll need to schedule inspections. This is a critical part of the process, as these inspections ensure that work was done according to code. Failure to pass an inspection can result in having to redo parts of your project or incurring additional fees.
Securing a permit for roofing projects may seem like a daunting task, but it’s an essential step that protects homeowners. It ensures that all work done meets safety standards and increases the overall value of your property. This guide serves as a general outline for the process, but remember, requirements can significantly vary by location. Always check with your local building department to ascertain specific requirements for your project.

When it comes to removing your old roof to make way for a new one, safety and efficiency are paramount. Without the correct procedures in place, you run the risk of causing unnecessary damage to your property or even injury to yourself. Here we detail a step-by-step process that will guide you through safely and efficiently removing your old roof.
Step 1: Preparation
Before starting the actual removal process, prepare your workspace. This includes:
- Setting up ladders and scaffolding securely.
- Positioning a dumpster or large garbage container nearby for waste disposal.
- Covering surrounding plants, structures, or items that could be damaged by falling debris.
- Ensuring you have all necessary safety equipment such as gloves, safety glasses, hard hats, and appropriate footwear.
Step 2: Removing Roofing Materials
Removal of roofing materials should be completed in sections. Start from the topmost point of your roof and work downwards:
- Gently lift off ridge caps using a roofing shovel or pry bar.
- Proceed to remove shingles or tiles in the same manner, working one row at a time.
Remember not to rush this step since hasty removal can result in cracked shingles or damaged underlayment beneath.
Step 3: Dealing with Underlayment
Once your shingles are removed:
- Examine the underlayment for damages; if it’s intact with minimal damage, it can stay.
- However, if there are signs of water damage or severe wear-and-tear, remove it along with other materials.
Take great care during this stage as improper handling can lead to bigger problems like leaks or structural weaknesses.
Step 4: Inspecting the Roof Deck
After fully exposing the roof deck:
- Check for rotten wood; replace any weak materials before proceeding further.
- Look for protruding nails and either remove them or hammer them flat.
Step 5: Cleaning Up
As the final step:
- Gather all removed roofing materials and dispose of them properly.
- Sweep or vacuum the surrounding area to clear it of hazardous objects like nails or sharp pieces.
By following this process, you ensure that your old roof is removed in a safe and efficient manner, ready for the new roofing installation. Remember, safety comes first – if at any point the task seems too daunting or dangerous, it is recommended to seek professional help.
The underlayment, a crucial component of your roofing system, plays a significant role in preserving the integrity of your roof and your home. It acts as an added layer of protection against water infiltration and helps improve the overall performance of your roof. In this segment, we delve into the detailed process of underlayment installation when installing new roofs.
I. Understand Your Underlayment Options
Before embarking on the underlayment installation process, it’s important to understand the different types of underlayments available:
- Asphalt-saturated felt: This traditional underlayment is water-resistant, not waterproof. It’s often referred to as ‘felt paper’ or ‘tar paper’.
- Rubberized asphalt: More expensive than asphalt-saturated felt, this type contains higher percentages of asphalt and rubber polymers making it waterproof.
- Non-bitumen synthetic: This is made from thermoplastics like polypropylene or polyethylene that are water-resistant.
II. Preparing The Roof Deck
The first step in installing an underlayment involves preparing the roof deck. Ensure it’s clean, smooth, and free from any protruding nails or screws that could potentially tear the underlayment.
III. Installing The Underlayment
Once you’ve prepared the roof deck, you can proceed with the actual installation.
- Beginning at the bottom: Start at the eave edge of your roof and roll out one row of underlayment in line with these edges.
- Fastening: Use roofing nails or staples to fasten it about every 12 inches vertically and every 6 inches horizontally.
- Overlapping: Overlap each subsequent row by at least two inches over the previous one to ensure no gap for water penetration. At corners and valleys, consider doubling up for extra protection.
- Covering: Continue this process until the entire roof deck is covered with underlayment.
IV. Finalizing The Installation
To finalize the installation, secure the underlayment at the top of each roof plane with a row of roofing nails. The nails should be spaced 6 inches apart and about 1 inch from the top edge of the underlayment.
During this entire process, it’s crucial to maintain safety precautions to avoid any injuries and ensure quality work. Remember, even though it seems straightforward, it’s always recommended to hire professional roofers who have been specifically trained and have experience in this domain.
The installation of underlayment is not just a step in roofing but a significant aspect towards ensuring your home’s longevity. Correctly installing an underlayment can go a long way toward giving you peace of mind knowing your home has an extra layer of defense against water damage.
Replacing a house roof is a monumental task that requires specialized skills and experience, making it ill-suited for beginners or those with little experience in the industry. Here are five critical reasons why home roof replacement should not be treated as a Do-It-Yourself project.
- Safety Concerns: Working on a roof presents significant safety risks. These include potential falls, improper use of tools, and even accidental electrocution if work is conducted near power lines. Even minor oversights can lead to serious accidents or injuries.
- Quality and Warranty Concerns: Roofing manufacturers typically provide warranties for their products, which often require professional installation to remain valid. Amateur installation can lead to poor quality work that not only voids the warranty but also increases the risk of leaks or premature wear.
- Insufficient Knowledge: Installing a roof involves more than merely nailing shingles on plywood. It includes understanding ventilation requirements, knowing how to correctly install flashing around chimneys or vents, and recognizing signs of structural damage that need repair before new roofing materials are added.
- Time-Efficiency: Roofing professionals have the necessary experience and training to replace roofs efficiently without compromising on quality. On the other hand, beginners might take much longer due to learning curves and lack of expertise.
- Building Code Requirements: Roofing contractors are aware of local building codes and regulations related to roofing work. Non-compliance with these standards can result in fines or penalties from local authorities.
| Pros | Cons |
| DIY could save money initially. | Potential safety risks could lead to hefty medical bills. |
| The satisfaction of completing your project. | Poor quality work could result in costly future repairs. |
| Flexibility in deciding when work gets done. | Extended project timelines due to lack of expertise. |
| Learning new skills. | Non-compliance with local building codes can result in fines. |
From a cost perspective, it might seem tempting to treat roof replacement as a DIY project. However, when you factor in the potential risks and long-term considerations, it becomes clear that this is one area where professional services are invaluable.
Therefore, unless you are highly experienced and confident in your roofing abilities, it is generally advised to leave roof replacements to the professionals. This approach will not only ensure the highest quality work but also provide peace of peace of mind knowing that your home’s roof has been installed safely and correctly.
- Exploring Diverse Roofing Options with Roofers in Northern Virginia: An Extensive Guide
- Comprehensive Guide on Hiring Roofers in Northern Virginia
- Discovering the Best Roofers in Northern Virginia: A Comprehensive Guide
- Meet the Best Roofers in Northern Virginia
- Understanding the Role of Roofers in Northern Virginia